Kirk Marshall Photography Kirk Marshall Photography

Blog

Manual Settings

April 14th, 2020

The first thing that needs to be considered when attempting to shoot a series of images for stitching into a panorama are the camera settings. For consistent, quality results everything should be taken off of auto and set manually.  

Most grand vistas are going to have a range of light intensities and light temperatures that will cause the auto settings of your camera to kick in and automatically adjust to compensate. In any single image that’s beneficial but those changes will make it challenging if not impossible to achieve invisible blending in a picture composited from multiple images. 

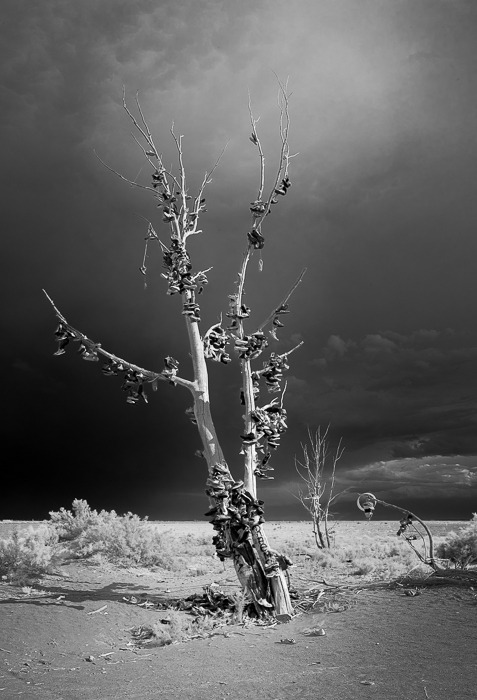
This picture, which is a composite of five images, of the Hinkley Shoe Tree just outside of Hinkley, Utah illustrates my point. The top and bottom regions are relatively light when compared to the middle of the picture. Had I used auto settings, blending of the five images would have been more difficult than using consistent, manually configured settings. 

(Fujifilm X100T, 23mm, 1/320s, f/9, ISO 200, infrared conversion)

Stitching

April 7th, 2020

The idea with stitching is simple: take multiple, overlapping images and aggregate them into a single larger image. 

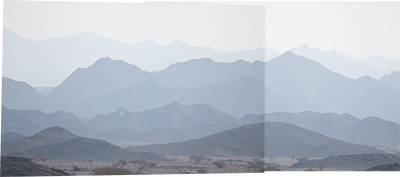
This pair of images of the Hajar Mountains in Oman were one of my first (successful) attempts at stitching.

(Canon Rebel XSi, EF70-300 @ 300, 1/500s, f/6.7, ISO 100)

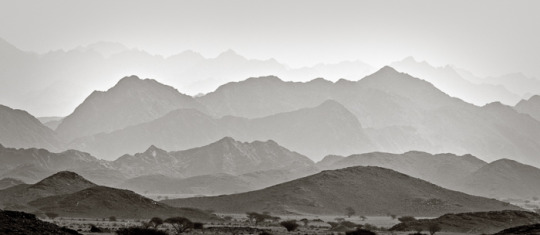
Here’s the final image with appropriate blending, cropping and contrast adjustments.

I suppose achieving such results might seem complicated; trying to align the images properly, get the exposure blending just right, etc. But it’s not; it’s just a couple of mouse clicks in Lightroom, a few more if you’re working in Photoshop, but all-in-all it’s trivial with today’s software options. (Lightroom and Photoshop aren’t your only options, there are a number of others; some free, some for purchase. Google is your friend.)

While the basic idea is simple, there are a number of things that can make the results less than satisfactory. I’ll address a few of those issues in my next few posts. 

Compositional Limits

March 17th, 2020

Sometimes I find myself overly constrained by the frame around the image I’m shooting. Of course the image framing imposed by the camera is always a constraint but here I’m saying overly constrained because I find that sometimes it doesn’t allow me to capture the full scope of my vision. I most often encounter this constraint in landscape photography by it occasionally occurs in other genres as well. 

What to do? There are at least two approaches to the problem: use a wide-angle lens or stitching. 

Let’s consider the choice of lens first. My standard lens, the one that’s mounted on my camera most frequently, is a normal range zoom lens (24-70mm). Since I am shooting with a full-frame sensor (24mm x 36mm) setting the lens at 50mm results in a field of view of 27° x 40°. Zooming the lens out to 24mm expands that field of view to 53° x 74° which opens the possibilities of what I can capture but can still be very limiting. 

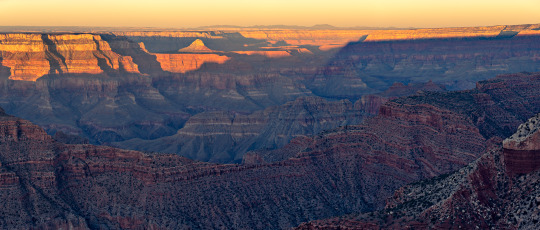
Standing on the rim of the Grand Canyon with a horizontal view that literally extends 270° and only having a 24mm lens can be disheartening.  How can you capture the grandeur without capturing the grand view? I could switch to a wider angle, for example my 16mm lens, but that still only expands the view to just over 90°.

Furthermore, using a wide angle lens distorts the relationship between near and far objects, emphasizing (or enlarging) objects close to the lens and shrinking (or deemphasizing) objects farther away. In my opinion this effect in some situations can result in artistically pleasing images but when employed in grand-view landscapes I find the results unappealing. I think the reason for this is that the diminution of far objects and overall scene distortion results in an image that is less impactful than the actual scene. The scene as experienced when standing at the view point, under a normal perspective, is more present and in-your-face than the result from a using wide angle lens. In my images I want to capture that feeling of being-there and the presence of the actual scene as much as possible.

Another consideration is usable bits

My primary landscape camera is a Sony α7RII with an image size of 42MB. This camera shoots in a ratio of 2x3 and results in an image of about 5300 x 7950 pixels.  

Many of the grand-view images that I shoot I plan on cropping to a long horizontal aspect ration suitable for hanging on a big wall over a couch or some such location. A common crop ration that I use for these wide panorama is one frequently used in movies: 1x2.35. 

Taking an image with my 16mm lens might capture a significant portion of the scene and provide a pleasing composition; however once cropped the final pixel count is significantly reduced and results in an image that is unsuitable for massive printing. For example, cropping a 2x3 image to 1x2.35 results in a loss of almost half the original data. The resulting image is 3383 x 7950 pixels, or only 23MB. Assuming a print resolution of 300dpi, the final image would natively be printed at 26.5″ wide. If my goal is to print a very large image (greater than 5 feet), starting with an image that is barely over 2 feet isn’t going to produce superior results. 

One way to overcome these limitations is through image stitching, which I’ll discuss in my next post. 

(From Sublime to Grand, Sony α7RII, FE 24x70mm @ 70mm, 1/200s, f/6.3, ISO 400, Image Size: 15148 x 6446)

Composition Games

March 10th, 2020

The technical aspects of creating a photograph are relatively simple. It takes some knowledge and experience to craft a properly exposed image with appropriate depth of field to express your mood. But those details are not the challenging part of photography; the real challenge is composition. 

It’s easy to fall into a photography rut, sometimes a game is the perfect way to bounce out and into new realms. Here are some that I use to get me thinking out of my own self-imposed box. 

Limitations

Most of my pictures are taken with similar settings; I tend to shoot with a 24-70mm lens, use a fairly small aperture and set the shutter speed to ensure no motion. One game that I occasionally play to force me into new territory is to choose something outside those standard parameters and try and make successful images with that alternate configuration. 

For example, I might try and shoot a series of images with the lens aperture wide open (small f-number) or swap out my standard lens for a wide angle (16mm) or telephoto (300mm) lens. These exercises force me to look at scenes from a different and new perspective that stretches my creativity into new realms.

Another somewhat popular self-imposed limitation is the disposable camera challenge. (A quick google search for those three words will provide you with plenty of details.) As photographers we’re usually shooting with the best gear we can afford with all possible artistic options (a focusable zoom lens, aperture choices, shutter speed settings, etc.). The disposable camera challenge takes away all those camera settings and forces us to just point and shoot. And true to the name it can be a challenge, albeit a good one. After shooting with a DSLR for a while using my cell phone with some of its inherent limitations can feel a bit like a disposable camera

Creativity

I often find myself with an interesting subject of which I shoot an image or two and then I quickly move on. Sometimes I realize I’m not exploring all the options for a given subject and I’ll challenge myself to shoot 20 different and distinct images of it. I quickly exhaust all the angles (front, back, side, top and bottom) and I’m left stretching my imagination in order to get out of my mental box. I have to delve into areas I normally wouldn’t venture (shallow depth of field, long shutter speed, camera panning, etc.). Getting to 15 is hard but I can still do it fairly rapidly. Getting those last five though… whew, yea; that’s a challenge. Give it a try, let me know how it goes.

When I’m trying to capture a preconceived image I frequently find myself waiting for the optimal conditions to arrive (sunset, blue hour, etc.). I’ll get all set up for the shot and then have an hour or more to kill before I press the button for the money-shot. Often, to kill time I’ll play the 20x20 game. 

The rules of the 20x20 game are that from the moment of inception you have to take 20 distinct images within 20 feet of your current location. They can be of anything, selfies, sidewalk cracks, tree bark, whatever. The idea is that since I’m there for the one preconceived image, I’ve devalued the rest of the scene. So the challenge is to make 20 images of the devalued mess, i.e. create something of visual interest out of nothing interesting. Play this game often enough and you’ll be surprised at what you start to see. 

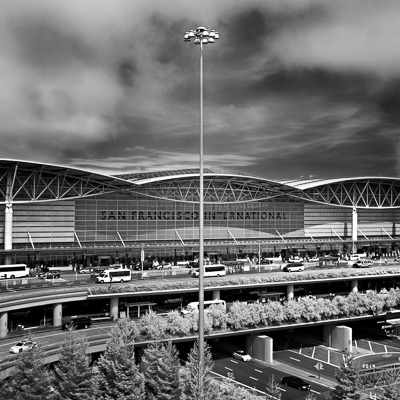
On my way home from a trip to San Francisco, CA I got to the airport a few hours early. To kill the time before my flight I played 20x20 (well, I fudged a bit on the 20 feet) and spent some time in one of the parking garages taking 20 pictures. This is one of them. 

image

(Fujifilm X100T, 1/125s, f/8, ISO 200, infrared conversion) 

Theme

The last game that I want to mention is shooting to a theme. The theme can literally be anything: strength, blue, taste, sound, movement, etc.). The idea is that you take a photograph that conveys or expresses that theme

One theme is the alphabet. The challenge is to take a photograph that expresses ‘A’, then another that screams ‘B’, and so on through ‘Z’. 

Other theme based photography challenges are available on the Internet. One that was quite active for a few years but now appears to be defunct is the Mission 24 flickr discussion group. (https://www.flickr.com/groups/mission24/) You should be able to find others that are currently active or you could just browse the Mission 24 archives for ideas to explore on your own. 

Composition is the holy grail of photography. Playing these games helps me keep my photography fresh and forces me to explore new realms. 

Inspiration

March 3rd, 2020

I spent a few minutes today browsing through the Top 101 Landscape Photographs from 2019.  

They’re all pretty amazing; you’ll find one of my favorites here…

https://www.internationallandscapephotographer.com/index.php/food/159-2019-top-101-landscape-photographs?786

These images were selected as finalists in The International Landscape Photographer of the Year contest. 

Of course they all exhibit technical mastery of exposure and depth of field which is to be expected in submissions to a Photographer-of-the-Year competition. (Notice the tack-sharp rendering in https://www.internationallandscapephotographer.com/index.php/food/159-2019-top-101-landscape-photographs?800.) 

What I was most captivated by in all of the images was the simplicity of the subject matters. Take the one I linked to above as one of my favorites (#786 by Stas Bartnikas). This image of a snow-melt pond on a glacier could hardly be more plain but the composition, with the pond placed just right of center and the raking light accentuating the texture in the surface of the snow, I find exquisite. The image is minimalistic in theme but maximalistic in texture and visual interest. Another amazingly simplistic yet exquisite image is #755 by Lazar Ovidiu, just a collection of humps of snow, which is made captivating through the use of contrast and color. 

If you have a minute or two, take a look, you won’t be disappointed. Hopefully, you’ll also find some inspiration for your own practice. I know I have. 

Summary

February 25th, 2020

I started this discussion about photography clear back in June, 2019 and I’ve covered a lot of ground. There’s more I want to cover but before I do I think it will be useful to summarize what I’ve discussed up to now. 

I started this series discussing light and defined photography as the act of capturing light interacting with a subject. As photographic artists we need to understand and use the attributes of light (point source/diffuse, color/temperature, front/side/back) to best express our view, interpretation or feelings about the subject.  Furthermore, understanding the intensity of light, the limitations of our camera being able to capture its intensity and adjusting our camera’s settings to accommodate that intensity are basic knowledge that we must grasp. 

After discussing light, I moved through the design/decision process I use when shooting. The process follows the alphabetical sequence CDE: composition, depth of field and exposure.  

With regard to composition there’s a lot to think about: subject matter, focal points, prominence, figure/ground separation, distractions, tension, flow and contrast (focal, tonal, textural and color). I also discussed lenses and the effect the choice of lens length can have on the image. 

The discussion of lenses led us into the concept of acceptable focus and how to control the depth of field using aperture. 

Lastly, I discussed exposure.  I presented the use of shutter speed to both achieve proper exposure and express artistic vision. I also talked about ISO (film speed) to accommodate low light conditions and control noise. 

This is a lot to think about every time I push the button on my camera. Using the initialism CDE helps me remember each of the important aspects of photography and encourages me to use an ordered process to ensure my images express my vision to the best of my abilities. 

image

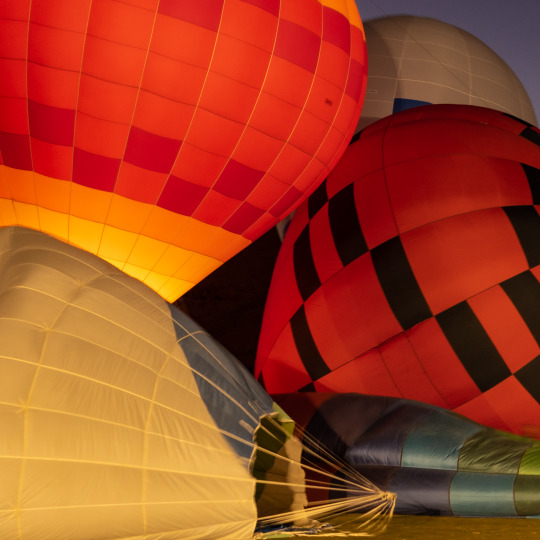
(Sony α7RII, FE 24-70 @ 70mm, 0.5s, f/6.7, ISO 1600)

The concepts that I’ve presented up to now are what I consider the fundamentals of photography. With a bit of thought and practice they can be understood and integrated into a shooting routine but to truly master them could take years. Occasionally I fail to achieve an objective for a shoot and find myself having to go back and remind myself to follow the CDE process.  

Exposure Triangle

February 18th, 2020

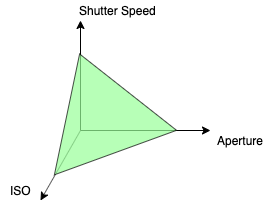
Back on January 14, 2020 I introduced the exposure triangle. Since then I’ve discussed the relationship between aperture and shutter speed; now I’ll expand the discussion to include ISO. 

image

I mentioned that there are numerous aperture/shutter speed combinations that will produce a properly exposed image. Adding ISO to the mix allows even more combinations, as is represented by the green plane in the graphic above. 

ISO settings have a direct and noticeable effect on the noise (or grainy-ness) of an image, therefore a specific ISO setting is most often chosen to adjust for the available light, with low ISO values being favored. I generally leave my ISO set on a low value, usually 100, and only increase it when needed to accommodate low light conditions. 

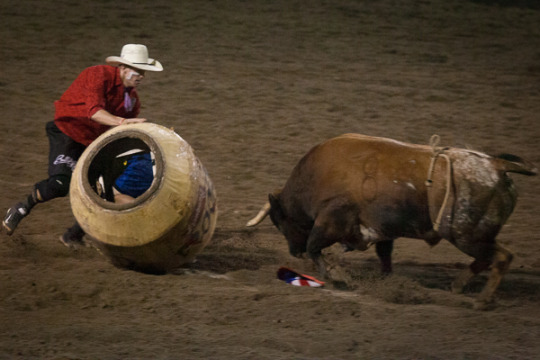
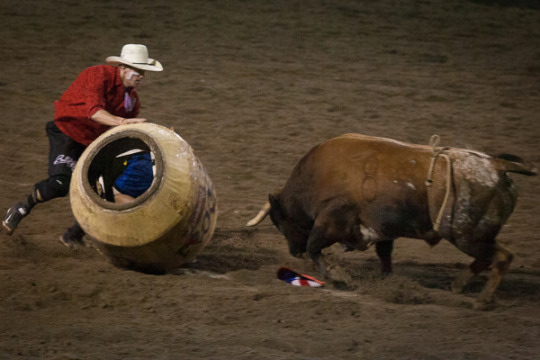
This image from the Oakley Rodeo, which I presented last week, was shot at night using the stadium’s lights. I needed to use a relatively fast shutter speed (1/250s) to freeze the action and stabilize the camera. (I was shooting hand-held using an approximately 200mm image stabilized lens.) I wanted to stop down the aperture slightly (to f/6.7) to provide me with a decent depth of field. Therefore, to achieve proper exposure, I needed to boost the ISO significantly, to 12800.

image

(Canon 5DMII, EF70-300 DO @ 210mm, f/6.7, 1/250s, ISO 12800)

As an artist working in the photographic medium it is important to have a solid understanding the exposure triangle and the relationship between aperture, shutter speed and film speed (ISO). 

Film Speed (ISO)

February 11th, 2020

Film speed is a term that’s not used much any more but I feel it better describes the concept we need to discuss than the more common, current term ISO. Film speed refers to how sensitive the film, or digital sensor, is to light. 

Back in the day, film was manufactured with silver halide grains which are light sensitive. Film with large grains was called fast film because it would expose quickly; or to state it another way, it would work well in low-light. Slow film, with small silver halide grains, would take more time to expose properly and could therefore be used in bright-light (daylight) conditions.  

Over the decades there have been many ranking systems that provided a relative assessment of how fast film would expose. Two of the more common ones were ASA and DIN. These various rating systems were combined and superseded in 1974 by a collection of ISO standards. (ISO is the acronym for the International Organization for Standardization which addresses not just photography but provides standards on a huge range of topics.) 

The size of the light sensing pixels in a digital sensor is set when the sensor is created/built and can’t easily be swapped out like with a roll of film. Therefore manufacturers of digital cameras have come up with other creative ways to mimic or emulate film speed within a digital camera. Some of the ways include altering the sensor’s voltage, analog and digital amplification. All of these ways have benefits and limitations; there is no panacea. 

The detailed complexities of how these methods work aren’t critical for our discussion but suffice it to say that in general terms they all decrease the signal to noise ration. The result is an increase in the signal (our picture) but also an increase in the noise. 

Consider this picture shot at the Oakley, UT 4th of July rodeo. 

image

(Canon 5DMII, EF70-300 DO @ 210mm, f/6.7, 1/250s, ISO 12800)

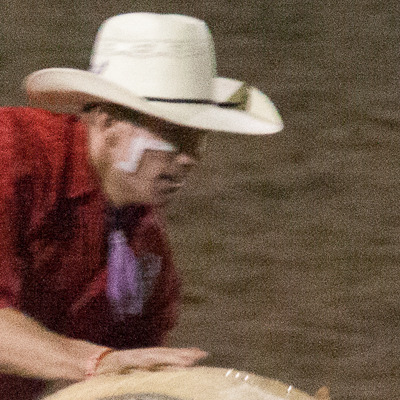
I boosted the ISO to 12800 to adjust for the conditions, which allowed me to take the shot, but doing so resulted in significant noise in the final image. 

By zooming in on the rodeo clown’s face we can clearly see the noise.

image

Signal to Noise Ratio

February 4th, 2020

Signal to noise ratio is a measure that compares the strength of the desired signal, or useful information, to the background noise, or irrelevant information. 

To illustrate these concepts consider two scenarios. 

Imagine your hiking in a forest on a foggy day, miles from the nearest road. You and your hiking partner stop for a break and while resting you have a quiet conversation. You have no trouble hearing each other even though you’re both talking in library-voices. 

Now imagine you’re at a rip-roaring New Years Eve party; the music is loud and everyone is whooping it up, having a good time. You’re shouting into the ear of the person beside you trying to have a conversation but you’re only catching half of what they’re saying. 

In the forest you have a dramatic difference between the signal (your voice) and the background noise (the deadened sounds of the forest in fog). It is easy to pick out the sounds that make up words and you can easily carry on your conversation in hushed tones. 

The party is a radically different situation. The background noise is so loud that even shouting, it’s hard to pick out the signal from the noise. 

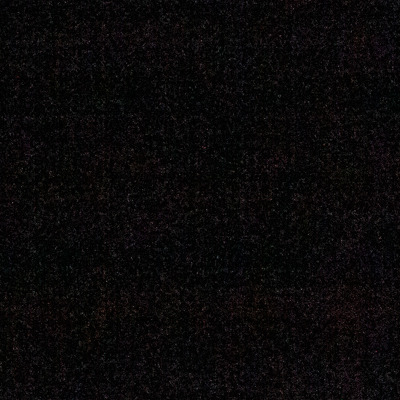
Electricity is noisy. The electricity that powers the digital sensor in your camera causes noise. When that noise is significant as compared to the signal (the scene we’re shooting) it can cause problems. An easy way to visualize the noise in your camera is to take a picture with the lens cap on. The resultant image should be a uniform field of black, but it’s not. When zoomed in you should see speckles of color and light that were triggered by the background noise in the sensor. Here’s an example shot with my Canon 5DMII. 

image

Using Shutter Speed

January 28th, 2020

Often our choice of shutter speed is dependent on available light, but that’s not what I want to talk about in this post. I want to discuss the use of shutter speed to express artistic choice in our images. Usually, this relates to capturing or expressing movement of some sort. Let’s look at a couple of examples of movement of water. 

In this image (taken at Kilauea Point National Wildlife Refuge, Hawaii) I wanted to capture the potential energy of the wave suspended in motion. I chose a relatively fast shutter speed (1/320s) in order to freeze the motion and capture the crash at the peak of it’s height. I was fortunate in that the bird, a frigate I think, flew through the frame just at the right moment to provide a focal point for the image. 

image

(Canon EOS XSi, EF-S55-250 @ 116mm, f/9, 1/320s, ISO 100)

In this next image (of a small waterfall in Kanarra Canyon, Utah) I wanted to capture the motion of the falling water. To accomplish that I used a slow shutter speed (1/2s) which succeeded in blurring the individual water drops and giving a suggestion of motion in the still frame. 

image

(Samsung Galaxy S10, 4.3mm, f/1.5, 0.5s, ISO 50)

This last image, of the tufas at Mono Lake, CA, I wanted the theme of the image to be the tufas, without other distractions. I used a very long exposure (30s) to ensure that the small waves in the water would be completely averaged out and the surface of the lake rendered flat and still. 

image

(Canon 5DMII, EF24-105 @ 50mm, f/6.3, 30s, ISO 500)

These three images represent some of the possibilities that can be expressed using shutter speed creatively.